In the world of beauty, eyebrows are often called the “frames of the face” for good reason. They can completely transform your look, providing structure, balance, and expression. A well-groomed, perfectly arched eyebrow can make your eyes appear more open, define your facial features, and even create a more youthful appearance. However, achieving that perfect arch is often considered a daunting task. This comprehensive guide will walk you through everything you need to know, from understanding your face shape to mastering the techniques and tools required to shape your brows like a pro.
Understanding Eyebrow Shapes and Face Symmetry
The first step to a perfect eyebrow arch isn’t about plucking or waxing; it’s about understanding the unique contours of your own face. The ideal eyebrow shape is one that harmonizes with your facial structure, creating a balanced and aesthetically pleasing look.
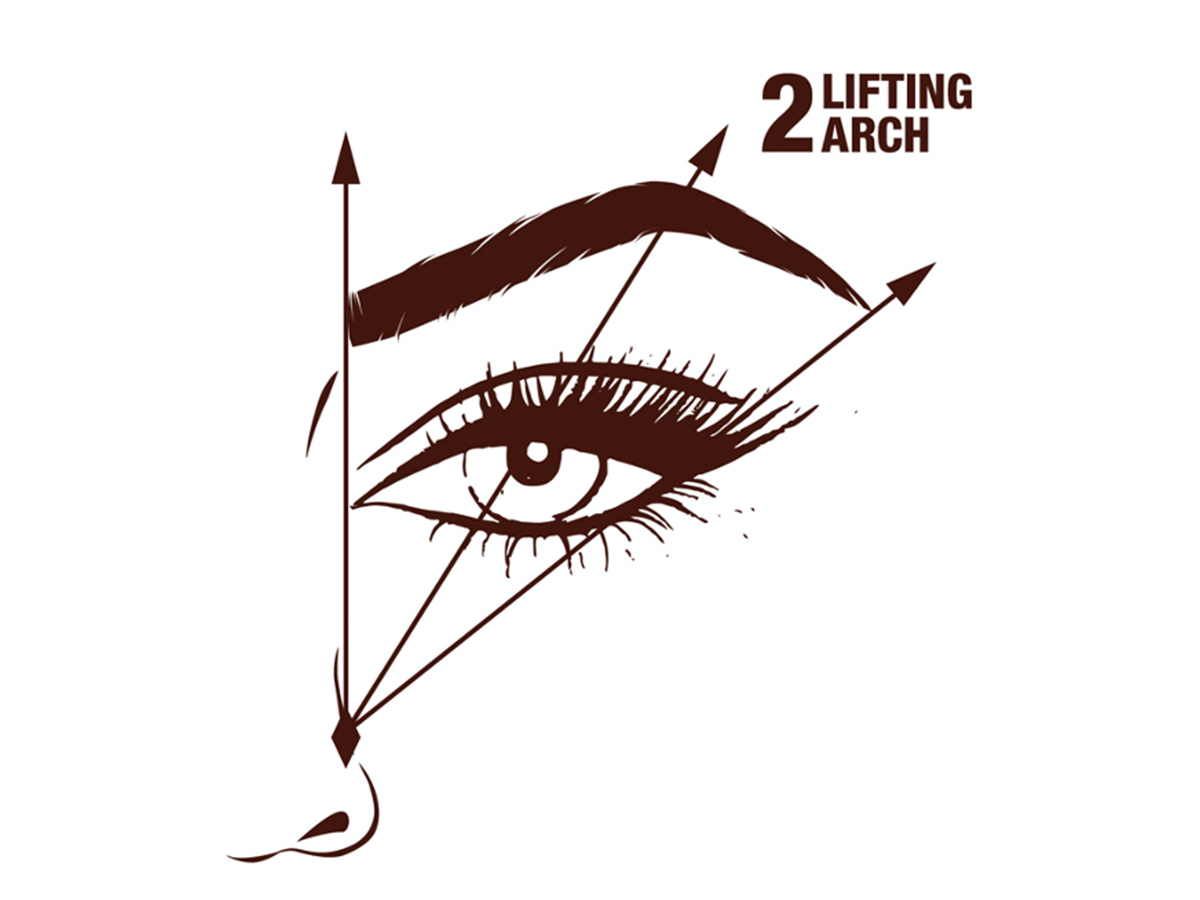
A. The Golden Ratio and Eyebrow Mapping: Professional makeup artists often use the “Golden Ratio” principle, or what is more commonly known as eyebrow mapping, to find the perfect starting, ending, and arch points for your brows. This method ensures your brows are in perfect proportion to your facial features.
- The Starting Point: Use a makeup brush or a pencil to draw a straight line from the outer edge of your nose up to the inner corner of your eye. Where the line meets your brow bone is where your eyebrow should begin.
- The Arch Point: To find the natural arch, look straight ahead in a mirror. Place your brush against the outer edge of your nose and pass it diagonally through the center of your pupil. The point where the brush intersects your brow is where the highest point of your arch should be.
- The Ending Point: Now, pivot the brush so it extends from the outer edge of your nose to the outer corner of your eye. The line that meets your brow bone is where your eyebrow should end.
B. Matching Eyebrows to Face Shape: While eyebrow mapping is a universal technique, considering your specific face shape can help refine your arch.
- Round Face: A high arch will help to elongate the face, creating a more oval appearance. Avoid round or flat brows, which can make the face look even more circular.
- Long Face: A flat or straight brow with a minimal arch can help to shorten the appearance of a long face.
- Square Face: A soft, curved arch will help to soften the angular lines of a square jaw. Avoid sharp, highly defined arches.
- Oval Face: This is considered the ideal face shape for brows. A soft, slightly arched brow complements the natural balance of an oval face.
- Heart-Shaped Face: A soft, rounded arch can help to balance a wider forehead and a narrower chin.
The Essential Tools of the Trade
Having the right tools is just as important as knowing the right techniques. Investing in high-quality tools will make the process of shaping your brows much easier and more precise.
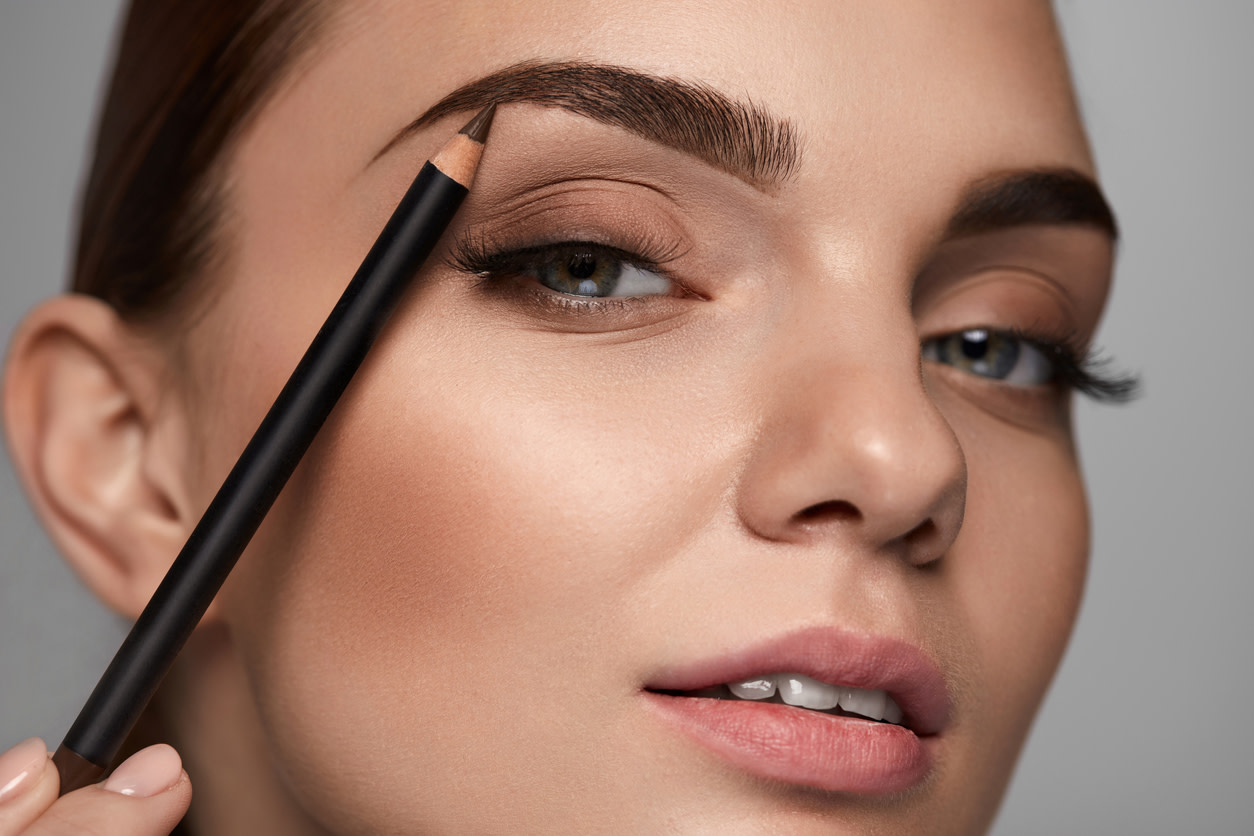
A. Tweezers: A good pair of slanted or pointed tweezers is non-negotiable. Slanted tips are great for general hair removal, while pointed tips are perfect for plucking fine or ingrown hairs. B. Spoolie Brush: This mascara-like wand is used to brush your eyebrow hairs into place before and after trimming and shaping. It helps you see the natural growth pattern of your brows. C. Eyebrow Scissors: Small, sharp scissors are essential for trimming long hairs that can make your brows look unruly. D. Eyebrow Razor: Also known as a facial or brow razor, this tool is great for removing peach fuzz and cleaning up stray hairs around the brow without the pain of tweezing. E. Brow Gel: A clear or tinted brow gel helps to set your hairs in place, providing a polished and long-lasting look. F. Eyebrow Pencils and Powders: These products are used to fill in sparse areas and define the shape of your brows. Pencils offer precision for creating hair-like strokes, while powders provide a softer, more diffused look.
The Art of Eyebrow Shaping: Techniques Explained
Once you have your tools and have mapped out your ideal shape, it’s time to get to work. Start slowly and methodically; you can always remove more hair, but you can’t put it back.
A. The Tweezing Technique:
- Prep: Begin with clean skin. Use a warm washcloth to open up the pores and soften the hair follicles, making tweezing less painful.
- Brush: Use a spoolie to brush your eyebrow hairs upwards.
- Outline: Lightly outline your desired shape using a brow pencil. This creates a guide and helps you avoid over-plucking.
- Pluck: Using your tweezers, pluck individual hairs one at a time, pulling in the direction of hair growth to avoid breakage. Focus on the hairs below the brow line first, working your way towards the arch. Only remove stray hairs above the brow if absolutely necessary.
B. The Threading Technique: Threading is an ancient hair removal method that uses a thin, twisted cotton thread to roll over and pull out hairs from the root. It offers a cleaner and more precise result than tweezing and is often less irritating for sensitive skin. It’s a skill that requires practice and is best performed by a professional.
C. The Waxing Technique: Waxing involves applying warm wax to the hairs and then quickly pulling it off with a strip. This is an efficient method for removing a large number of hairs at once. However, it can be harsh on the skin and requires a trained hand to avoid burns or accidental hair removal.
D. The Trimming Technique: After tweezing, use your spoolie to brush your eyebrow hairs straight up. Take your small brow scissors and carefully trim any hairs that extend beyond your natural brow line. Do this with a light touch to avoid creating bald spots.
Filling in Your Brows: The Finishing Touch
Even with a perfect shape, most brows have a few sparse spots that need to be filled in for a seamless look.
A. Choosing the Right Shade: Select a brow product that matches your hair color. For a natural look, opt for a shade that is one or two shades lighter than your hair. B. Pencils vs. Powders:
- Pencils: Use a brow pencil with a fine tip to create small, hair-like strokes in the direction of your hair growth. This is perfect for defining the shape and filling in small gaps.
- Powders: Use an angled brush to apply brow powder. This method is great for building volume and creating a softer, more diffused brow. C. The Final Set: Once you’ve filled and defined your brows, use a clear or tinted brow gel to brush the hairs into place. This sets your look for the day and adds a natural sheen.
Addressing Common Eyebrow Problems
Even with the best intentions, things can go wrong. Here are some solutions to common brow issues.
A. Over-plucked Brows: The most common mistake. The best solution is patience. Stop tweezing and let them grow back. Use a brow growth serum or castor oil to stimulate hair growth. B. Uneven Brows: No one has perfectly symmetrical brows. Instead of trying to make them identical, focus on making them look like “sisters, not twins.” Use a pencil to fill in and balance them as best you can. C. Patchy Brows: Hormones, diet, and over-plucking can lead to patchy brows. In addition to a growth serum, consider supplementing with biotin or other hair-healthy vitamins. Microblading or brow extensions are also options for a more long-term solution.
In conclusion, achieving a flawless eyebrow arch is an art form that blends science and skill. By understanding your facial structure, using the right tools, and mastering the proper techniques, you can transform your brows from unruly to refined. Remember, the goal isn’t to create a perfect, cookie-cutter look, but to enhance your natural beauty and frame your unique features.