The world of beauty is no stranger to viral trends, but few have achieved the universal appeal and staying power of the “glazed donut nail.” Catapulted into the spotlight by Hailey Bieber, this manicure is the epitome of modern elegance. It’s a subtle, chic, and ethereal look that whispers sophistication rather than shouts for attention. Characterized by a sheer, milky base and a luminous, pearlescent sheen, it perfectly mimics the delicate glaze of a freshly made donut. The best part? This A-list look isn’t confined to expensive celebrity nail salons.
For manicure enthusiasts and DIY beginners alike, achieving the perfect glazed donut finish at home is not only possible but also incredibly rewarding. It’s a technique that, once mastered, will elevate your at-home nail game to professional new heights. Forget booking appointments and paying salon prices; this comprehensive guide is your all-in-one resource for mastering the iconic look.
We will break down every single step, covering both the long-lasting gel polish method and a clever, accessible approach using regular nail polish. We’ll dive into the essential tools you’ll need, share insider tips from nail professionals, troubleshoot common mistakes, and even explore the delicious variations of the trend, from strawberry to chocolate glazed. Get ready to transform your nails into an iridescent dream.
The Anatomy of a Trend: What Exactly Are Glazed Donut Nails?
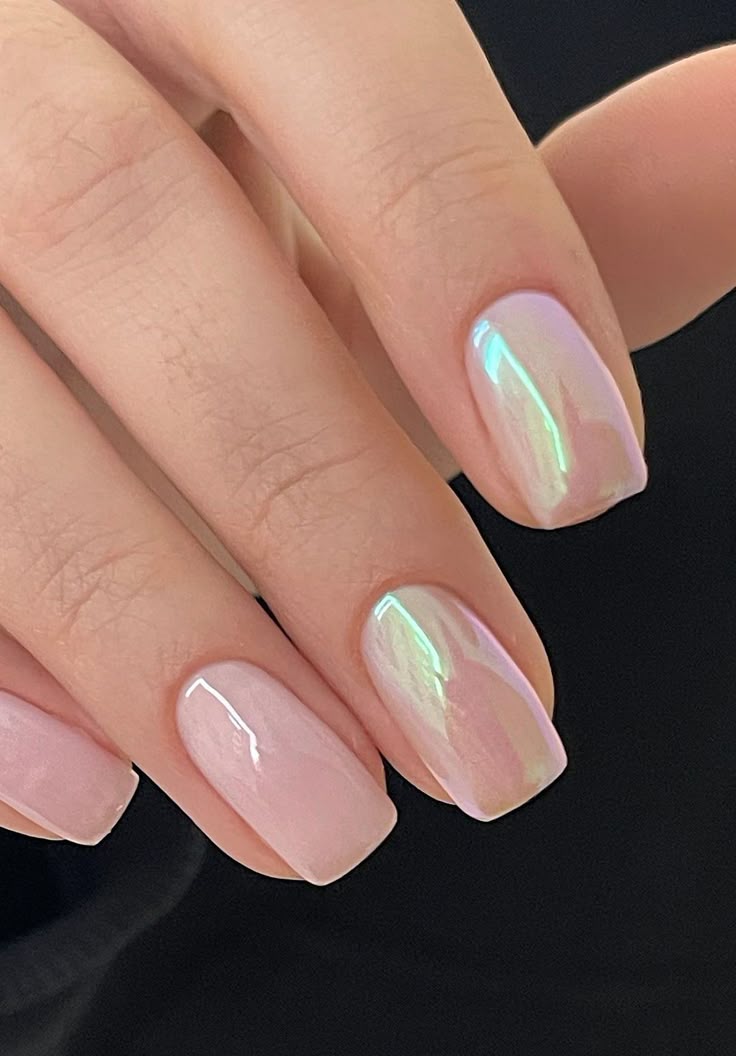
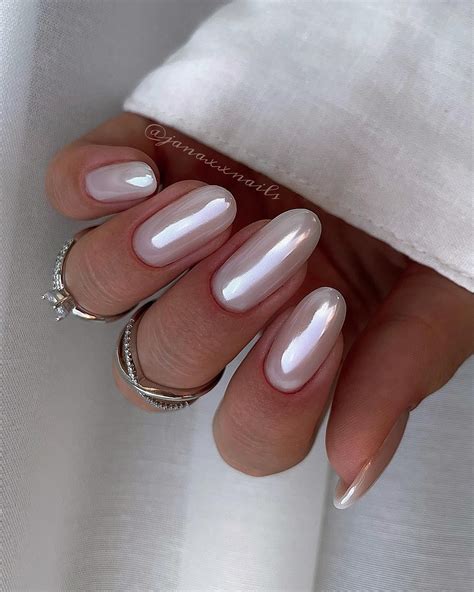
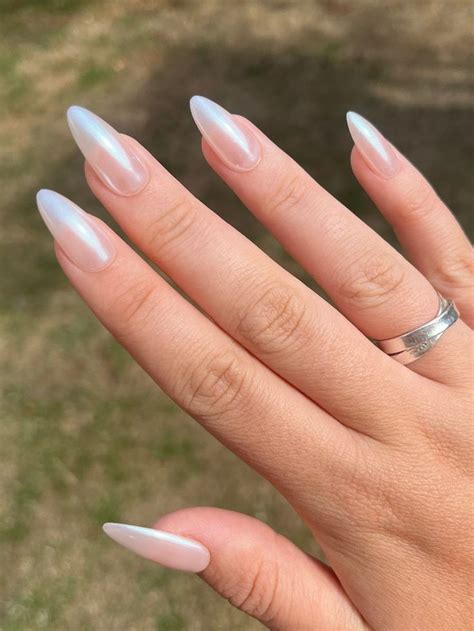
Before we dive into the “how,” let’s understand the “what.” At its core, the glazed donut nail is a masterclass in minimalist beauty. It’s not about bold colors or intricate designs. Instead, its beauty lies in its finish and dimension.
The look is achieved by layering a very specific combination of products. It starts with a translucent, milky-white or soft pink base color. This creates a clean, healthy-looking foundation for the nail. The real magic, however, comes from what’s applied on top: a micro-fine, white chrome powder. When buffed onto the nail, this powder creates a high-shine, iridescent effect that shifts beautifully in the light. It’s not glittery or sparkly; it’s a seamless, liquid-like luster.
The appeal is undeniable. It’s a universally flattering look that complements every skin tone, nail shape, and outfit. It aligns perfectly with the popular “clean girl aesthetic”—looking polished and put-together with an air of effortlessness. Popularized by Bieber and her nail artist Zola Ganzorigt, this manicure has proven to be more than a fleeting moment; it’s a new classic.
Your Essential Toolkit: Gathering Your Glazing Supplies
To achieve a flawless finish, you need the right tools for the job. We’ve broken down the essentials based on whether you’re using gel polish for a salon-quality, long-lasting manicure or regular polish for a lamp-free approach.
A. The Gel Polish Method (For a Flawless, Two-Week Finish)
This method provides the most durable and professional-looking results. The key is the UV or LED lamp, which cures the gel for a rock-hard, instantly dry finish.
- Nail Prep Tools: A nail file, a buffer block, a cuticle pusher, and cuticle nippers.
- UV or LED Lamp: This is non-negotiable for curing gel polish.
- Nail Dehydrator or pH Bonder: This step removes oils from the nail plate to ensure maximum adhesion. You can also use isopropyl alcohol.
- Gel Base Coat: Creates a protective layer and helps the color adhere properly.
- Sheer Gel Polish: The base color. The most popular choice is a milky white (like OPI Funny Bunny in gel) or a soft, sheer pink.
- No-Wipe Gel Top Coat: This is the most crucial product. A “no-wipe” top coat cures to a perfectly smooth, non-tacky surface, which is the only way the chrome powder will adhere correctly.
- White Chrome or Pearl Effect Powder: This is the magic ingredient. A little goes a very long way.
- Silicone Applicator or Eyeshadow Sponge: For burnishing the powder onto the nail.
- Soft, Fluffy Brush: To dust off any excess powder.
B. The Regular Polish Method (The Accessible, Lamp-Free Approach)
No lamp? No problem. You can still achieve a beautiful glazed effect with a clever technique, though it may not last as long as a gel manicure.
- Nail Prep Tools: Nail file, buffer block, and cuticle pusher.
- Regular Base Coat: To protect your natural nails.
- Sheer Regular Polish: The same milky white or soft pink colors as the gel version.
- A “Sticky” or Quick-Dry Top Coat: This is the secret weapon for the regular polish method. You need a top coat that dries to a tacky finish, as this is what the powder will stick to.
- Chrome Powder or a Shimmery Eyeshadow: True chrome powder works best, but in a pinch, you can use a finely-milled, pearlescent white or champagne eyeshadow.
- Soft Makeup Brush or Your Fingertip: For applying the powder.
- Final Water-Based or Regular Top Coat: To seal the design without smudging.
The Masterclass: Your Step-by-Step Glazed Donut Tutorial
With your tools at the ready, it’s time to create the magic. Follow these detailed steps carefully for a flawless result. The key to this look, regardless of the method, is impeccable nail prep.
A. The Gel Polish Method (Salon-Quality Results)
- Prepare for Perfection: Start by shaping your nails with a file. Gently push back your cuticles. Lightly buff the surface of your entire nail with a buffer block. This removes the shine and creates a slightly rough surface for the gel to grip onto. Finally, cleanse the nail with a lint-free wipe soaked in isopropyl alcohol to remove all dust and natural oils.
- Apply the Base: Apply a thin layer of your Gel Base Coat to each nail. Be careful not to get any on your skin. Cure under your UV/LED lamp for the time specified by the manufacturer (usually 30-60 seconds).
- Build the Milky Foundation: Apply one thin coat of your chosen sheer white or pink gel polish. This first coat will likely look very transparent, which is normal. Cure it under the lamp. Apply a second coat for a slightly more opaque, milky look. Cure again.
- The Critical Top Coat: Now, apply a thin layer of your No-Wipe Gel Top Coat. This is the layer the chrome powder will adhere to. Curing this layer perfectly is the most important part of the process. Cure it for the exact recommended time. Under-curing will leave it too wet, and the powder will clump. Over-curing will make it too slick, and the powder won’t stick at all.
- Apply the Chrome Powder: Once your nails are out of the lamp, immediately dip your silicone applicator or eyeshadow sponge into the chrome powder. You need the tiniest amount. Gently rub the powder onto the surface of your nail. Start near the cuticle and work your way to the tip. As you buff, the powdery finish will magically transform into a seamless, high-shine, pearlescent mirror. Continue buffing until the entire nail is covered and gleaming.
- Seal Your Masterpiece: Using a soft, fluffy brush, carefully dust off all excess powder from the nail and the surrounding skin. Apply one final layer of the No-Wipe Gel Top Coat, making sure to “cap” the free edge of your nail by running the brush along the tip. This seals the powder in and prevents chipping. Cure for a final time, and you’re done!
B. The Regular Polish Method (No Lamp Required)
- Pristine Prep: Just like the gel method, flawless prep is key. File, shape, and gently buff your nails. Clean the nail plate thoroughly to ensure your polish lasts as long as possible.
- Base and Color: Apply one thin layer of your regular base coat and let it dry. Follow with one or two coats of your sheer white or pink polish. Let the color coats dry for at least 5-10 minutes. They should be dry to the touch.
- The “Sticky Base” Trick: This is the crucial step. Apply a layer of a quick-dry top coat. Now, you must wait for the perfect moment. You want the top coat to be about 80% dry—no longer wet, but still tacky and slightly soft to the touch. This “tacky window” usually occurs between 30 and 90 seconds after application.
- Press on the Powder: Using a soft makeup brush or even your fingertip, gently press and buff the chrome powder (or shimmery eyeshadow) onto the tacky nail. Be gentle to avoid smudging the polish underneath. You won’t get the same high-shine, mirror-like buff as with gel, but it will create a beautiful, pearlescent sheen.
- The Final Seal: Wait at least 5 minutes for the powder and tacky layer to set. Then, take your final top coat and “float” it over the nail. This means loading your brush with a good amount of top coat and applying it gently without letting the bristles drag on the nail surface. This technique prevents the brush from smearing your delicate chrome finish. Let it dry completely.
Beyond the Basics: Delicious Trend Variations
Once you’ve mastered the classic milky-white glaze, you can experiment with a whole menu of delicious variations. The technique remains the same; only the base color changes.
- A. Strawberry Glazed Donut Nails: For a soft, feminine twist, simply swap the milky white base for a sheer, baby pink polish. This gives the chrome a warm, rosy iridescence.
- B. Chocolate Glazed Donut Nails: This cozy and chic version uses a sheer brown or nude polish as the base. The chrome powder on top creates a stunning, bronzed, and sophisticated look that’s perfect for autumn.
- C. Blueberry or Lilac Glazed Nails: For a pop of pastel, use a sheer lavender or pale blue base. The chrome finish gives these colors a futuristic, ethereal glow.
- D. Glazed French Manicure: Elevate the timeless French manicure. First, create your classic French tip with a sheer pink base and a white tip. Then, after applying your top coat (and curing, for gel), apply the chrome powder over the entire nail. This mutes the white tip slightly and gives the whole nail that signature, cohesive glaze.
Your New Signature Look Awaits
The glazed donut nail trend is more than just a fleeting fad; it’s a celebration of understated glamour. It proves that the most impactful looks are often the most simple. With the right tools and techniques, this coveted, celebrity-approved manicure is completely achievable in the comfort of your own home. Whether you choose the durable gel method or the accessible regular polish approach, the key lies in meticulous preparation and a little bit of patience.
So go ahead, experiment with the classic look or try a new “flavor.” You now have all the insider knowledge you need to create a flawless, shimmering, and utterly chic manicure that will have everyone asking which salon you went to.